We now reach our penultimate blog on Game Changer (previous features can be found via the blog’s main page).
There are so many fascinating ideas in this book that it is impossible to do more than merely scratch the surface on this blog. Instructive snippets are present on virtually every page and even though the games are usually deep and complex, there are plenty of lessons on a more basic lesson which will be easy enough for any chess players – junior or senior – to take on board.
One striking feature of Alpha Zero’s play is the way in which it manages to bring the most unlikely of pieces into the attack using sacrifices and manoeuvres that we would find either too costly or too slow. Alpha Zero clearly believes ‘it’s not where you start, it’s where you finish.’ This is nicely demonstrated by the following example.
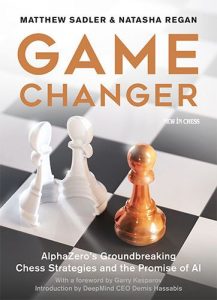
Stockfish 8 – Alpha Zero
The first obvious feature that should draw the attention here is that Black has a knight on the edge of the board. Every junior knows the knights are more effective if they are in the centre. If given one more move, Black may decide to play ….Ng8 and bring the knight back out to f6. However, Stockfish 8 pounces to smash open the black pawns.
11 Bxh6 gxh6
Why has Alpha Zero allowed this to happen? And how does the knight on c6 soon find itself at the cutting edge of a big attack?
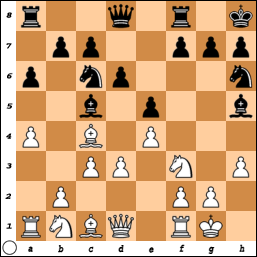
Fast forward a few moves…
Alpha Zero has a plan for the knight; a manoeuvre to take it close the white king. As humans, we would not move the knight because the b7-pawn would be captured – with the a6-pawn to follow. It is hard to believe any of us would consider losing two pawns to relocate the knight. Yet Alpha Zero had no such worries and the game continued:
13 …Ne7 14 Bxb7 Rb8 15 Bxa6
It is not clear, at this stage, what Alpha Zero has in return for the pawn sacrifices and the weakened ringside structure. Yet after just a few more moves the ideas become much clearer.
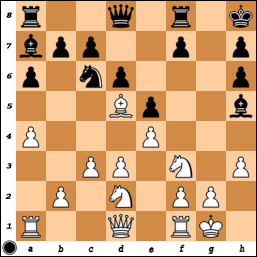
At this point I think most humans would suddenly prefer to be Black. The knight is in a dominant position and it is very difficult to chase it away (note that playing g3 would lose the h3-pawn). The reason Alpha Zero allowed the kingside pawns to be split is that it can now use its major pieces to attack down the g-file. Indeed, the queen found its way to g7 very soon after the position given above. Alpha Zero eventually won the game after 97 moves.
Compare the first and third diagrams. In the first, White appears to be rock-solid. Where – and how – could Black possibly attack? In the third, the attacking chances are obvious. Yes, it has cost Black a number of pawns – but looking at the position, which side would you rathe be? Junior players are – much more often than not – far better at attacking than defending. I would much rather be Black against a junior player here.
This wasn’t a one-off; there are further examples in the book of Alpha Zero using the open lines created by pawn sacrifices and ruined structures to whip up extremely powerful attacks.
How can we turn the ideas of Alpha Zero into winning ideas in our games? We will never be able to analyse the positions anywhere near as deeply, but we can certainly be more aware of how to use Knight manoeuvres, regardless of how slow they appear to be at first glance. By the time of the third diagram, White must be dreaming of finding an earlier opportunity to swap off the bishop for the black knight. Just compare their influence now!
We can also be more aware of the moments when we can sacrifice pawns to create open lines towards the opponent’s king. It could be that there will be moments when the defending side can return the pawns to slow down the attack – but when have you ever known a junior opponent do that willingly?
Sacrifice! Manoeuvre! Attack!